

Today I had to cancel another session. A past wedding client had her first baby this week and we had to cancelled their newborn lifestyle session that I was looking forward to for months . As much as I know and understand (and appreciate!) our physical distancing procedures right now, it’s still hard to watch sessions cancel. It’s realizing that my clients aren’t getting the beautiful documentary portraits they want and deserve. I also know it’s a very small thing to give up in a time of sacrifices, but it doesn’t make it less difficult. I love documenting my clients stories, as they are, in every stage. I wish I could still go into homes and photograph every beautiful moment as it happens. But right now, and for the foreseeable future, that’s not going to happen.
Today I decided what I can do is share one of my most valuable smart phone photography tips so you can document these unprecedented days as they unfold around you. You can be your own family historian- taking pictures and writing in a journal to leave a personal memoir of 2020. There is beauty in the chaos and beauty in the mundane. Years from now we will look back at this time, understanding the full spectrum of our situation and how it changed us forever. I hope we have photographic evidence of our time at home, as difficult as it seems some days. One of the most basic things to consider when documenting your days is lighting and proper exposure. They are key elements in creating amazing images of your children with the camera you usually have on you- your phone. I use my phone every day to capture childhood- my Instagram is filled with iphonegraphy and perfectly imperfect memories.
Fortunately, iPhones have made it easy to choose a proper exposure.
Simply touch the screen to the area you want properly exposed.
Hold down your finger till a box appears and “AF LOCK” is written on the top of the screen.
This means the exposure is locked and won’t jump around as you move your phone. This means the image won’t get brighter or darker even if you point your camera to a different light source. This can be a game changer.
The best part is you can slide the sun icon up and down to bring the exposure up or down – over exposing (i.e., making it too bright) or darkening the image. You can have control over the lighting, just like with a professional camera.
If you don’t have an iPhone, don’t worry; most smart phones come with this feature in their camera; you just may have to do a quick google search on how to activate it with your particular brand of phone.
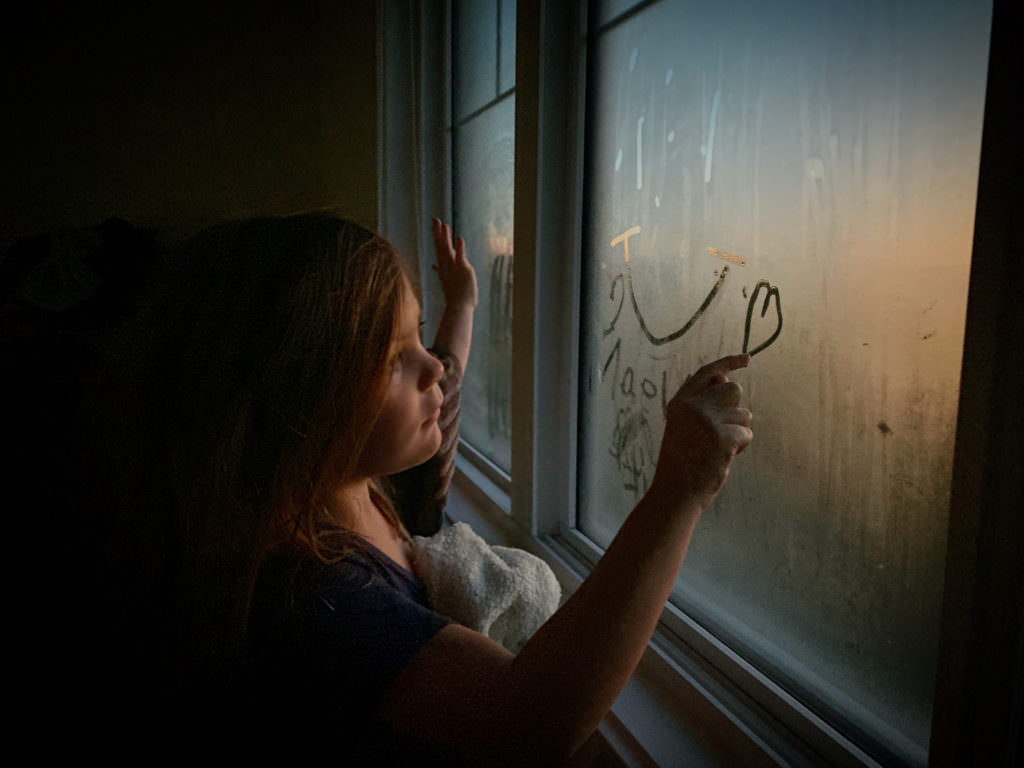
Here’s an example of one that I took using the AF lock button, exposing on Maeve’s face. My iPhone camera tried to expose for the shadows, but I wanted the shadows dark and the face lightly exposed by the morning sun. By locking the exposure I could move my camera and not worry about the light changing to expose for the dark room.

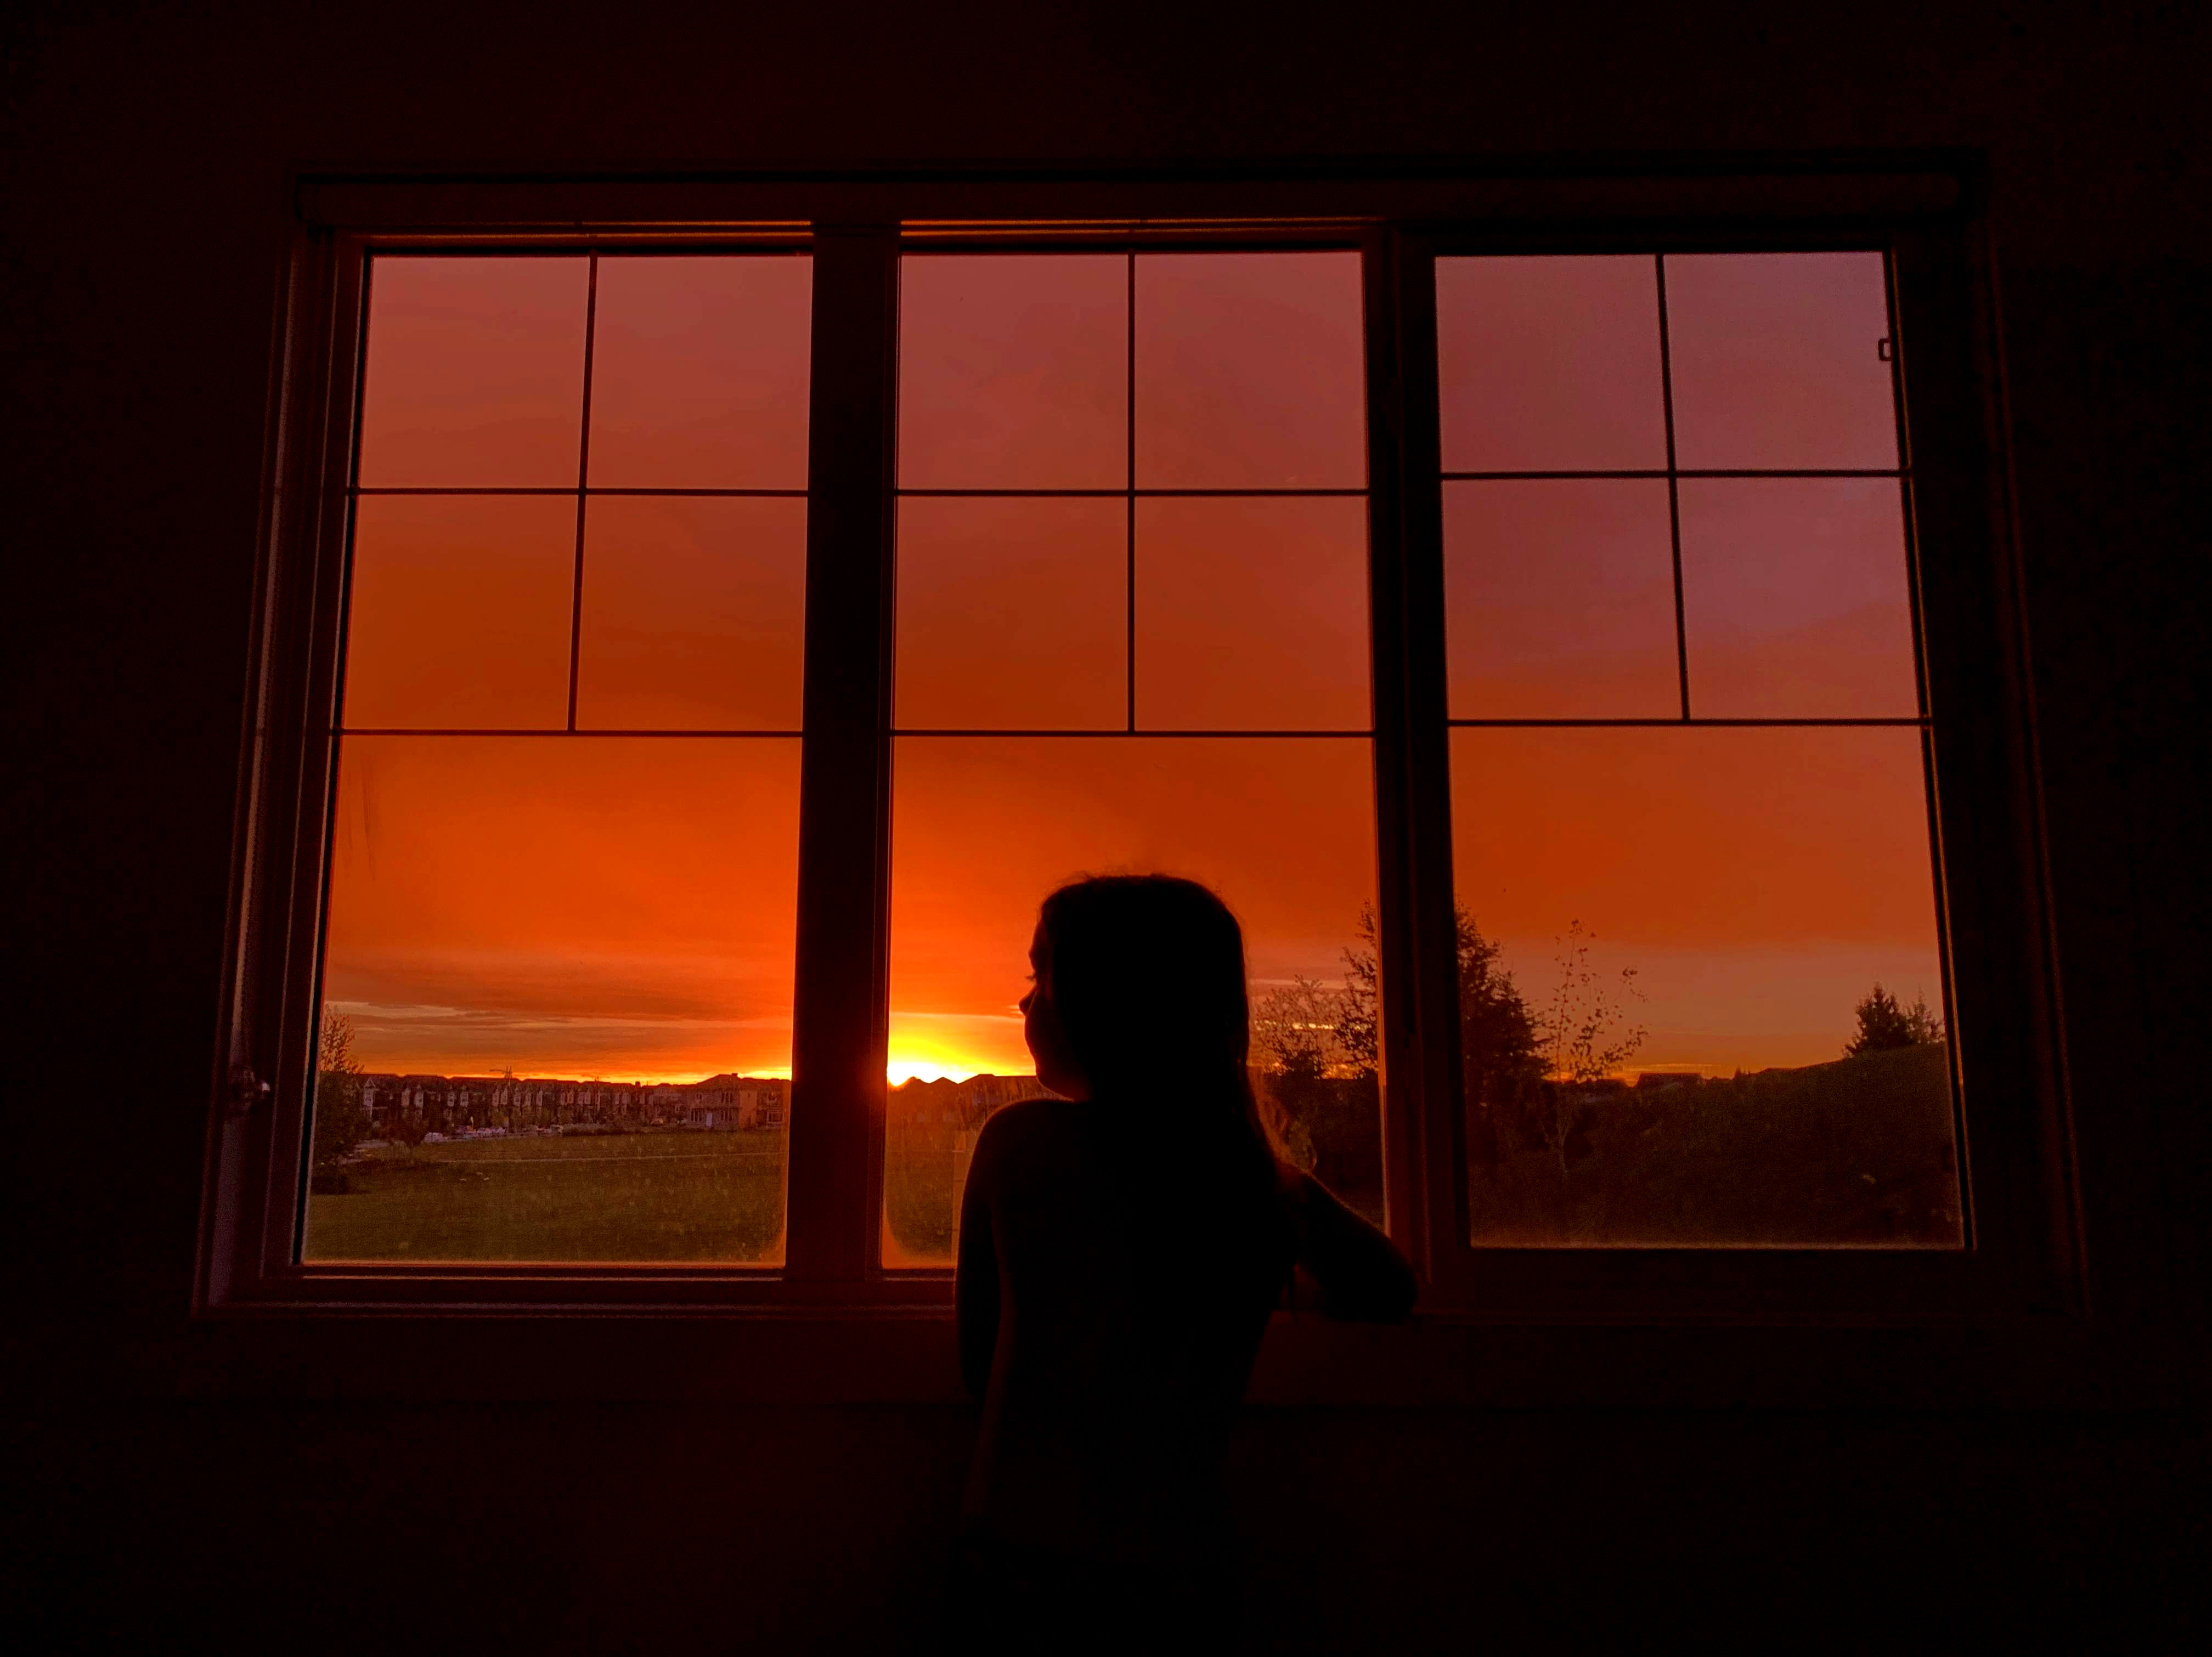
I generally love photographing kids outside at sunrise or sunset (my very favourite time for portrait sessions!) but if we’re stuck at home I can make do with a window silhouette. This image is properly achieved by exposing for the sunlight and pulling down the exposure for my daughter to become completely dark. The AF lock button is very important for these types of shots as your phone will immediately try to compensate the exposure to brighten faces. By locking down the light first you can get the dark shadows and expose properly for the sunset behind. This trick works great outside with trees or other elements to create a silhouette with the sun behind the subject.
Keep in mind…
Before you snap a picture, stop and look at the light as you are setting the exposure – is there shadows across the face? Is the face too bright and “glowing” (overexposure)? Are the subjects squinting into the sun? Are there pockets of light everywhere?
Simplifying your lighting can make all the difference in the world in your final photo.
The simplest and easiest light to work with is open shade, as it’s clean, simple, and consistent across your children’s faces.
Here’s an example of a shot that could be a typical quick snap, compared to one I properly exposed (using the method I described above) and while being mindful of the light.
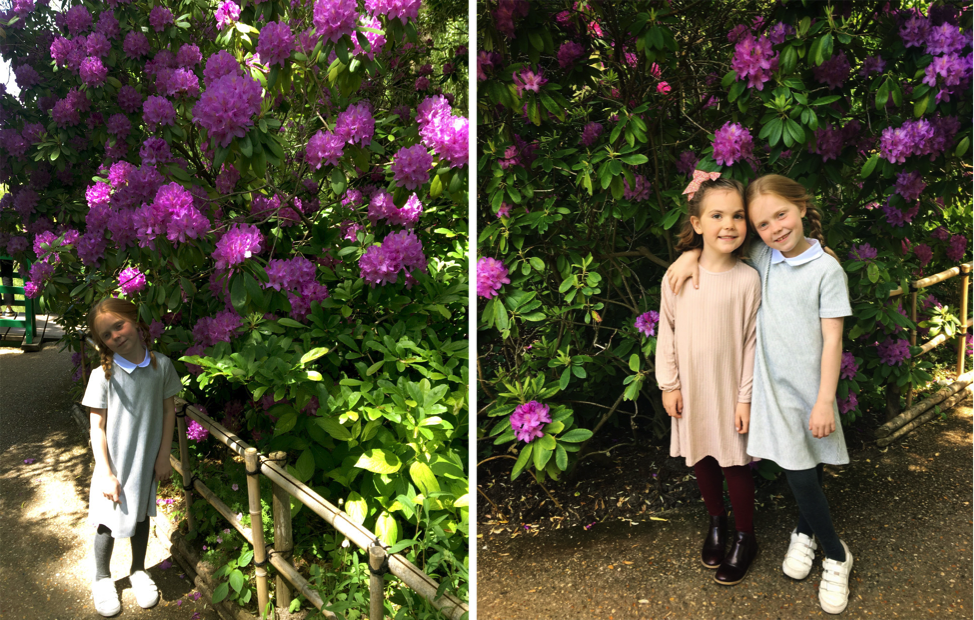
In Monet’s Garden in France, my Violet year old really wanted pictures with the purple flowers. She posed herself in front of the tree and naturally put face in the shade- but notice the bright light patches and dark lighting on her face in the picture on the left. By moving the girls 3 feet to a spot with open shade and no pockets of light, and then properly adjusting the exposure with the AF lock function, the entire image looks completely different! This is a good technique to use inside your home or in your own backyard. Move around to find the proper light and then expose your image properly. Taking a couple of minutes to find better light can make all the difference.
Hopefully these quick tips help you start documenting your family more confidently. If you’d like more tips, you can 4 more delivered directly to your inbox with my newsletter sign up. If there’s enough interest I can release a quick online course to help you all photograph your family. Just send me a message if you’d be interested 🙂
Kelsy


Loved this article
When is your training
Sign me up